Pages


Showing posts with label powder sugar. Show all posts

Tuesday, July 17, 2012

DON'T NUT, DONUTS!


My friend made some donuts and cinnamon rolls for her little nieces' birthday couple months ago.  When she told me she is going to make cinnamon rolls, I told her to add bacon in your cinnamon rolls.  She and everyone else thought I was nut at first, but she still "bought" my idea.  And suprisingly, they turned out great and unique and everyone loved them.  Her recipes of making the cinnamon-bacon rolls and donuts are super easy -

Cinnamon-Bacon Rolls -

1 roll of ready to bake cinnamon rolls
1 round cake pan
1 pack of bacons

  1. Open the ready to bake cinnamon rolls and put one slice of bacon and roll the rolls.
  2. Place the rolls in a round cake pan (I suggest using round cake pan because it is the perfect way to keep the round shape of the cinnamon rolls).
  3. Bake as directed and then done!
Donuts -

1 pack of store bought biscuits
Vegetable oil for frying
A big and a small round cookie cutters
  1. Open the store bought biscuits and use your round cookies cutters to cut them in a donut shape.
  2. Heat the vegetable oil, once it's heated.  Put your donut dought in the oil until golden brown on both sides.
  3. Decorate your donut with powder sugar or with an easy donut glaze (click here).

And find these cuper cute donuts on the website.  They are from a bakery in Japan.  How cute!

Wednesday, November 2, 2011

German Apple Strudel Recipe


We invited our friends and family to our house for dinner almost every other month the first half of 2011.  And each time, we tried to make the dinner to a themed dinner.  Asian, Italian, Mexican, Germany, BBQ...Unfortunately, we have been so busy lately, and stopped gathering at our house for this themed dinner thingy. 

On our German themed dinner, I made this German apple strudel.  As always, I used few different recipes I found online and made some adjustments to turn to my own (kind of). 

Ingredients


  • 5 Fuji apples (or Granny Smith apples), peeled, cored, halved, and diced


  • 1/2 cup raisins


  • rums


  • 1/2 cup brown sugar, packed, plus more for sprinkling


  • 1 tablespoon ground cinnamon


  • 1 tablespoon granulated sugar


  • 1 tablespoon of nutmeg


  • 1 box phyllo dough, thawed (I didn't use the whole box though)


  • 2 to 4 tablespoons butter, cut into small pieces or PAM, melted, plus more for brushing


  • powder sugar (optional)


  • Instruction
    1. Preheat the oven to 350 degrees F.
    2. Dice your apple evenly. 

    3.     And soak your rasins in rum in a microwave safe container.  And heat it for 40 seconds and let it sit for about a minute before draining out the alcohol.


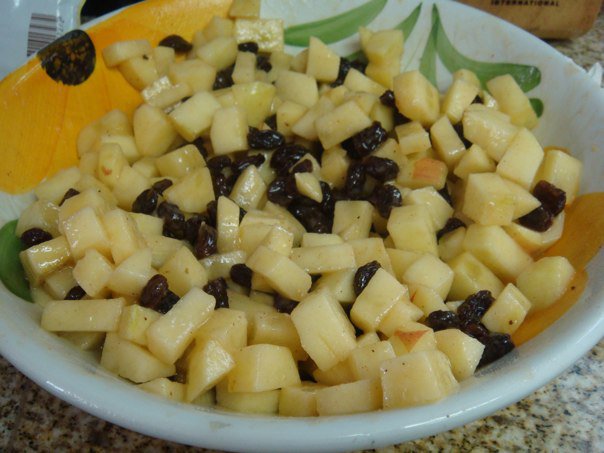
    4.     Now mix the apples and the raisins together in a big bowl, add brown sugar, sugar, nutmeg and cinnamon together. 


    5.     Set the dough out on the counter, with box still closed, for 1-2 hours to get the dough to room temperature.Open your ready to bake phyllo dough very carefully.  Prepare a clean wet towel because you need to wrap the remaining ones with the towel while you are working on the sheet.  They dry up very quickly, so work fast!
    

    6.     On a large cutting board or counter top, open the box of the dough, and slowly and carefully unroll the package.  Carefully and GENTLY brush the sheet with melted butter or SPAM (I highly recommend PAM for first timer, it's much easier to work with on the sheets). Please try not to tear the dough.  Repeat the same process, until you get 5-6 layers.  When you get to the last layer, fill in with the mixture of the apples and rasins.  

    PS: In between each layer, sprinkle some brown sugar.  The brown sugar would make the dough more flavorful and the texture will be crispier. 


    7.     Bake in the preheat oven for approximately 45mins or until golden brown outside.


    Done and sprinkle with powder sugar while you serve!


    Wednesday, September 28, 2011

    Easy Panna Cotta Recipe


    Panna Cotta means cooked cream in Italian.  It is a classic Italian dessert made by simmering together cream, milk and sugar, mixing this with gelatin, and letting it cool until set. It is generally from the Northern Italian region of Piemonte.  The dessert could serve with fresh fruits or hazelnuts.  If you want to have some bitter sweet flavor, try green tea powder (aka matcha) panna cotta.

    Here is my recipe (adopted from all recipe.com):

    Ingredients:


  • 1/3 cup reduced fat milk


  • 1 (0.25 ounce) envelope unflavored gelatin (look for it from the jello section at the grocery store)


  • 2 1/2 cups heavy cream


  • 1/2 cup white sugar


  • 1 1/2 teaspoons pure vanilla extract (look for it from the baking section at the grocery store)


  • 6 cleaned ramekin dishes


  • Direction:
    1. Pour milk into a small bowl, and stir in the gelatin powder and mix well. Set aside.
    2. In a saucepan, stir together the heavy cream and sugar, and set over medium heat. Bring to a full boil, watching carefully, as the cream will quickly rise to the top of the pan. Pour the gelatin and milk into the cream, stirring until completely dissolved. Cook for one minute, stirring constantly. Remove from heat, stir in the vanilla extract and pour into six individual ramekin dishes.
    3. Cool the ramekins uncovered at room temperature. When cool, cover with plastic wrap, and refrigerate for at least 4 hours, but preferably overnight before serving.
    4. Serve with fresh berries (optional).


    Thursday, September 22, 2011

    Nutella and Banana Won-Ton Recipe

    Nutella banana won-ton with vanilla bean ice cream
    In the past 2 years, I invited my family and friends get together at our house for a themed dinner on the weekend.  Each time, we picked different themes for the dinner.  So far we have done Germany, Asian, BBQ, Mexican, Italian (twice) and Southern food.  Unfortunately, we have not had the themed dinner for a while due to every one's busy schedule on the weekend. 

    I made this very easy but extremely yummy Nutella and banana won-ton as our dessert for the Asian themed dinner.  As many of you might know, Asian or Chinese don't usually like sweet stuffs.  I remember Anthony Bourdain once said something on his show, No Reservation - At a Chinese restaurant, they usually give you an orange at the end of the meal as a dessert.  Yup, that's US!  Asian or Chinese don't usually eat sweet after meal.  If we do, we will probably had some bean soup (green, red or assorted beans) or rice ball soup to end our meal.  Even other Asian countries, they don't usually serve desserts after the meal too.  So when I was thinking of something to make for our Asian themed dinner, I was thinking of something Asian inspired but still appealing to my guests (sadly to say not everyone likes bean soup or other strange tasting or looking desserts most Asian like). 

    So I was thinking who doesn't like deep fried won-ton (or food, deep fried food taste so good), and Nutella (surprisingly, my guests had never tried this tasty hazelnut spread before) and banana topped with powder sugar and vanilla ice cream.  Just by thinking about it, it made my mouth watering.

    You will need:

    1 pack of square won-ton wrappers (available at Asian supermarkets or some regular supermarkets)
    1 small jar of Nutella (available at regular supermarkets)
    2-3 banana (don't pick those old or "too green" one)
    Vegetable oil (for deep frying dessert, I like to use vegetable oil because they taste milder than peanut oil.  But if I deep fried regular food, I would love to use peanut oil for more favor.)
    Powder sugar (optional)
    Vanilla ice cream (optional, I got mine from Trader Joe's)


    lay the won-ton wrapper on the mat and
     put about one teaspoon Nutella spread on the top of the wrapper
    (don't put too much though!)

    Put a banana slice on the top of the spread

    Seal them with water

    Heat the oil, and put the won-ton in the wok

    Thursday, August 11, 2011

    How to make your cupcakes look like a super model (without fondant)?


    Mrs. G has heard a lot of people expressed how much they dislike about gum paste and fondant decoration on their cupcakes.  Most of them agree that they make the cupcakes look like a "super model", but those decoration kill the flavor of a cupcake.  So if you don't like gum paste and fondant, what could you/C for Cupcake Cupcakery do to make your cupcakes look as amazing as their taste? 

    There are quite a few alternatives -

    Seasonal fresh fruits - such as strawberry, raspberry, and cherry. 
    
    Home made candied orange
    Dried fruits and nuts
    
    Cashew Nut Brittle Cupcakes (Picture from Blog - Our Eyes Eat First)


    Candies and other treats - or if you like a treat on the top of your cupcake, we could use candies, cookies, coconuts, etc.
    
    Easter chocolate candies with toasted coconut

    Belgium waffle
    Powder sugar, powder chocolate or shredded chocolate 

    Using powder sugar for decoration on cupcakes
    (Picture from the Cupcake Blog)
    Mixing fresh fruit and powder sugar for decoration
    (Picture from 123RF)
    
    Mrs. G home made vegan chocolate cupcake topped
    with shredded chocolate

    Fresh flower petals - some flower petals are edible, some not!

    Mixing fresh fruit and fresh edible flowers for decoration
    (Desert from Extraordinary Dessert; picture from Flickrfan Stan)

    Cupcake topper - you could get the toppers from any craft store or baking supply store.  Or you could even make your own toppers. 

    Picture from Epicute
    There are so many ways to make your cupcakes look great without sacrificing the taste of them.  I hope that this post could help you to decide what you could do with your cupcakes the next time without those fancy gum paste and fondant decoration.  Mrs. G personally thinks that these non-gum paste or fondant toppings are classy and tasty!

    Tuesday, July 26, 2011

    I need a break and a whoopie pie


    I have no idea since when whoopie pies have become a trend.  You see them everywhere now, even at Starbucks!  They are a very easy to make little treat at home.  They are also good for party, or put them in a cute box; they would become a very sweet and cute favor for your guests to take home.


    I found this chocolate whoopie pie's recipe from Food.com.  They came out taste good and moist, but they are very messy and sticky to roll though.  Since this is my very first time of making whoopie pies, I am sure I could develop a better recipe in future.

    Make about 20 pies
    Prepare Time: 20 mins
    Bake Time: Approximately 15 mins

    Whoopie Pie

    1. Preheat oven to 425F. Lightly coat cookie sheets with nonstick cooking spray.
    2. Whoopie Pies: In a mixing bowl, beat sugar and oil until crumbly. Add eggs and beat well. In separate bowl, combine flour, cocoa, baking soda and salt.
    3. Gradually beat flour mixture into sugar mixture. Add milk and mix together well.
    4. With lightly lightly floured hands, roll dough into 1 1/2" balls. Place balls 2" apart onto cookie sheets lightly sprayed with nonstick cooking spray. Flatten balls slightly with bottom of lightly greased flat-bottom glass.
    5. Bake at 425F for 5-6 minutes or until tops are cracked. Cool for 3 minutes before removing to wire racks to cool.
    I didn't make the filling.  I have a whipped cream in my fridge, so I just pipe my pies with the whipped cream.  But below is the filling recipe I found on Food.com.  If you are on the rush, whipped cream is a good alternative.  If you have ice cream at home, you could even make it like a ice cream sandwiches. 

    Filling

    4 tablespoons milk
    4 tablespoons butter or 4 tablespoons shortening, softened to room temp Filling: In a mixing bowl, beat together butter and confectioners' sugar. Beat in milk and extract until fluffy.
    3 -3 1/4 cups confectioners' sugar
    1/4 teaspoon vanilla extract (OR mint extract is good)

    1. Filling: In a mixing bowl, beat together butter and confectioners' sugar. Beat in milk and extract until fluffy.
    2. Pipe filling using pastry bag (or spread w/ knife) on to flat bottom of cooled whoopie pie and top with another whoopie pie to make a sandwich.


    Sunday, July 17, 2011

    Mr. G's Favorite Dessert

    Mr. G LOVES LOVES LOVES cream puffs!  Did I say that he loves cream puffs?!  He even requested to have cream puffs as his birthday "cake"!  Once in a while, I make cream puffs at home just to satisfy his sweet tooth.


    Cream puffs are one of the easiest desserts to make for new bakers.  I am going to share my recipe with you and hope you enjoy these cute little treats at home too.

    Prep:  25 mins  Cool:  10 mins  Bake:  30 mins
    Oven:  400F  Makes:  12 cream puffs or 24 mini cream puffs

    Ingredients:

    1 cup water
    1/2 cup unsalted butter
    1/8 tsp salt
    1 cup all-purpose flour
    4 large eggs
    3 cups whipped cream (either home made or from the store)
    or pudding, fresh seasonal fruits (e.g.. strawberries, blue berries) ice cream or powder sugar (optional)


    1. Preheat over to 400F
    2. Grease a baking sheet
    3. In a medium saucepan combine water, butter and salt.  Bring to boiling, then add flour ALL AT ONCE!  Stirring vigorously.
    4. Cook and stir until mixture forms a ball
    5. Remove from heat
    6. Cool for 10 mins (VERY IMPORTANT)
    7. Add eggs one at a time, beating well with a wooden spoon after each addition
    8. Drop 12 heaping tablespoons of dough onto greased baking sheet.  Bake about 30-35 mins (depends on your oven) or until golden brown and firm
    9. Cool
    10. Cut the puffs in half and insert whipped cream, or pudding, fresh fruits or ice cream inside
    11. DONE!